Introduction
Solar Inverters can transform solar energies and optimize energy production. The AC to DC and back to AC conversion can streamline the energy usage at the home.
But the problem happens when you don’t know how to hook the 12v inverters to the solar panels. Is that happening to you? If yes, this guide is the perfect stop.
Today, we will discuss how to hook the 12v Inverters to the solar panels and divide the process into various steps.
Materials Required
There are various items necessary to deal with your connection.
- A 12V solar panel must be compatible with your inverter.
- 12V Inverter
- 12V Battery (Deep Cycle or AGM). It can help store energy efficiently.
- The Charge Controller helps control the power and regulate the flow from the solar panels.
- Wires and connectors are ideal for connecting and hooking.
- A fuse or Circuit Breaker can provide an additional shield when the system undergoes sudden fluctuations in electricity or energy.
- The multimeter gives the readings and ensures the safety of the connections with compatibility.
Step-by-step instructions to hook the inverter

The connection of the solar Inverters with the solar panels can be complex because of multiple connections with other systems like the batteries and much more. Let’s discuss the various steps to provide energy to appliances.
Step 1: Position solar panel

First of all, there is a question— do you have your solar panel installed? If not, select an appropriate location where the sunlight is maximum. That is how you can generate the maximum energy from the sun. Efficient mounting and secure connection can maximize energy production.
Step 2: Link solar panel to charge controller
Now link your solar panel to the charge controller to regulate energy and efficient flow. Here are a few points you should know.
- Purchase the positive and negative terminal wires for the connection.
- Locate the solar input terminals on the charge controller. Can you find it?
- Grab the wire and connect the positive terminals of the solar panel and charge controller with each other.
- Do the same for the negative terminals of both the solar panels and charge controllers.
Step 3: Link the charge controller to the battery
The charge controller can flow the solar panel energy into the batteries. Therefore, you must connect its output terminals with the batteries to get the energy flow.
Here are a few steps to make it happen.
- Can you locate the battery output terminals on the charge controller? Those are the keys to managing your energy control and flow toward the battery.
- Now, find out the charge controller and batteries’ positive and negative terminals.
- Link the positive terminals of both with each other.
- Link the negative terminals with each as well. Use quality wires to avoid accidental cases due to disordered energy flows.
Pro advice: Use the circuit breaker between the connections to avoid voltage fluctuations and damage to the charge controllers or the devices.
Step 4: Connect the Battery to the inverter
Do you want the flow of energy from the batteries to the solar Inverters and conversion into the AC or DC? Here are a few steps like the above.
- There is an input terminal for the batteries on the inverter. Can you find it?
- If you have found the input terminals, locate the positive and negative terminals of the batteries and inverters.
- Connect the positive with positive and negative with negative terminals of the batteries with the inverters.
- Don’t forget to use the fuse or circuit breakers. They automatically turn off the power when there is a risk of damage.
Step 5: Test Connections
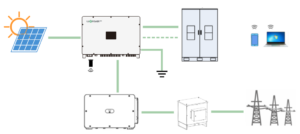
Do you understand the whole energy process? The energy goes from the solar panels to the charge controller and the batteries. The batteries supply the power to the inverters to convert and feed the appliances.
You can use the multimeter to test the compatibility and voltage at each connection. Check almost all the connections and ensure they are 100% accurate.
Step 6: Link the AC load
Finally, you can utilize the power coming out of the solar inverters. Wondering how? It is straightforward when you connect the solar inverters to the AC appliances. It starts providing power to the devices and helps get the exact load distributed to run the AC devices.
Safety Tips
Connection is something different from safety. A beginner can mess up the connections and might cause accidents. If there is an error, fuse and circuit breakers can be needed.
Let’s review the various things you might need for the safe installation.
Fuse protection
A fuse is a component that can automate safety at any point. For example, there is a sudden surge of energy. It can damage your appliances. The fuse can avoid this by turning off the system without requiring manual closure.
Wire gauge
The correct gauge of wire can ensure the smooth flow of the energy from the inverter to the devices or solar panels to the batteries. Always cross-check the cables to avoid overheating the system.
Ventilation
Overheating is a common phenomenon that occurs when you don’t have a ventilation system. So, introduce a ventilation system and enjoy the next-level performance of your solar systems.
Turn off the power when not needed.
Do you need the power? If it is no longer needed, close your appliances and turn it off. It can keep your system in good condition.
Conclusion
Hooking the inverter to the solar panel is a pretty smooth process. The problem occurs when you interact with the complexity of the inverters. The hectic configuration can cause several confusion.
Do you want to know about smooth and quality inverters?
Contact LuxPowerTek inverters. Our premium quality inverters streamline energy conversion. Plus, forget the expensive prices as we have offered the best prices. Explore the quality inverters right away!

