Installing a solar system in your house gives you many benefits. First, it makes clean and renewable energy. Second, it reduces your electricity bills amazingly.
Third, it contributes to environmental conservation by lowering carbon emissions.
Fourth, it enhances energy independence. So, why not install a solar system in your house?
Well, installing a solar system is simple. However, you need a certain level of expertise in electrical knowledge.
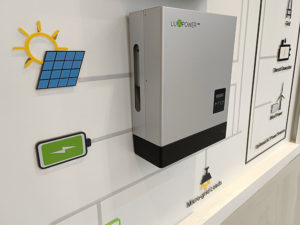
Installing a solar inverter is one of the crucial parts of this installation.
So, today, we will not talk about how to install solar panels. Instead, we will especially go for installing a solar inverter.
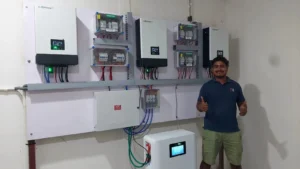
We will understand various solar inverter connections and eight professional installation steps.
In addition, we will also evaluate the importance of proper installation & safety precautions. Moreover, we will compare the differences between professional installations and DIY installations. At the end, we will give you some tips to finish your job accurately. So, let’s dig in.
Type Of Solar Inverter Connection
Solar inverters can be installed in three primary connection types. Each of these has unique advantages and limitations.
Note that one’s limitations are another’s benefits. Therefore, while choosing the correct connection type, know your application requirements.
Type#1 Grid-Tie System
This type of power inverter connection is directly connected to the utility grid. During pick hours, you can get sufficient electricity.
Interestingly, you can also sell excess energy to the grid. But you won’t get any backup powers during night or off-pick hours.
Advantages
- Financial benefits
- Simplicity
- Low maintenance
Disadvantages
- No Backup Power
- Grid dependency
Type#2 Stand-Alone System
This type of solar inverter connection comes with backup power. It is not typically connected to the utility grid.
As a result, it is independent and ideal for mostly remote applications. It means that if you produce excess energy, you won’t be able to sell it to the utility grid.
Advantages
- Backup power
- Flexible placement
- Independence
Disadvantages
- Excess energy cannot be sold
- Requires more maintenance
Type#3 Hybrid System

This type of system combines all the features provided by the two solar inverter connections above.
As a result, they are called hybrid solar inverter connections. These systems usually come with built-in MPPT.
Its primary purpose is to optimize solar panel output for efficient energy harvesting. It automatically draws the grid energy and sells the excess energy to the grid.
Advantages
- Backup Power
- Optimized Energy use between the grid, batteries, and appliances for efficiency
- You can return the excess energy to the grid when the battery is fully charged.
Disadvantages
- Initial upfront cost
- Complexity
- Requires maintenance like stand-alone systems
How To Install a Solar Inverter in Your House
Installing a hybrid solar inverter in your house is simple. All you need to do is know about wiring and electrical connections.
In addition, you can also follow the manufacturer’s guidelines to make it easy for you. The following eight steps can lead you to a professional installation of a hybrid solar inverter.
Step#1 Preparation
The first step is to prepare all the equipment and tools necessary for this setup. Of course, you must focus on essential safety precautions.
The hybrid solar inverter is light but weighs 25-30 pounds. Therefore, when you deal with this inverter, you can use your legs or co-workers to help you lift it to its installation place.
Step#2 Installation Site Assessment & Planning
The next step is to finalize a suitable place for your installation. In this case, you can consider various weather conditions from which you must keep your hybrid inverter away.
You can choose a garage or utility closet. Note that extreme humidity or temperature may affect the overall efficiency of your hybrid solar inverter.
Step#3 Mounting Solar Inverter
Once you have chosen a perfect location for your hybrid solar inverter, begin mounting.
Usually, a lux power tek hybrid solar inverter comes with mounting panels. Using a drill machine, you can make some holes in your wall.
By using royal plugs and screws, you can securely place the mounting panels. Now, use your legs or seek assistance from your co-worker to lift the inverter to its setup place.
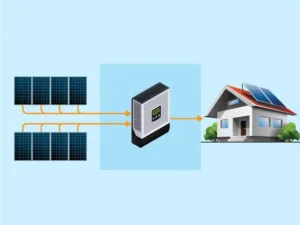
Step#4 Connect the Solar Panel to The Inverter
Check the user manual and connect the solar panel to the inverter accordingly. Check the article “How to connect solar panels to the inverter” for more information.
Step#5 Connect Solar Inverter with Main Loads and Grid
Based on the user manual, check out the wiring for the connection. Efficiently wire the main electrical panel and ensure secure connections.
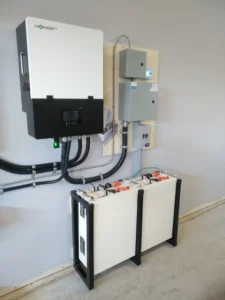
Step#6 Connect the Solar Inverter with Batteries (If Necessary)
If you aim for a stand-alone or hybrid connection, connect your battery to the inverter per the user manual. Also, ensure a secure connection to avoid accidents.
Step#7 Configuring Settings
Once you are done with installing and wiring, adjust the inverter settings.
You must follow the manufacturer’s instructions in this case. Program the inverter to meet specific energy needs.
Step#8 Test Run
Finally, before starting the device and connecting to the main electrical line, test your device first.
Conduct an initial system check to verify proper functioning. If you address any issues, troubleshoot them immediately or contact our customer support team.
A test run is necessary to ensure the hybrid solar inverter operates efficiently and reliably in your house.
Importance Of Proper Installation & Safety Precautions
Proper installation not only gives you reliability but is also technically necessary. First, it guarantees optimal performance for your solar system.
Consequently, it ensures that the solar inverter functions at its peak efficiency.
In addition, it also provides maximum power conversion from the solar panels. Second, proper installation gives your solar inverter an extended lifespan.
It ensures reduced wear and tear on the inverter, contributing to a longer lifespan overall.
Third, a well-installed inverter maximizes the energy yield from the solar panels. You know it is necessary for better returns on the investment in the long run.
Fourth, proper installation is less prone to breakdowns. Thus, it can minimize downtime and ensure a continuous & reliable power supply.
On the other hand, safety precautions are necessary for six reasons.
First, correct wiring & installation techniques reduce the risk of electrical faults.
As a result, safety precautions ensure the system’s and your property’s safety.
Second, following safety protocols during installation is necessary for electrical safety. It ensures a safer environment for maintenance or emergencies.
Third, adequately installed inverters are less likely to experience overload. It safeguards the system from damage caused by over-electrical currents.
Fourth, following safety precautions during installation reduces electrical hazards. For example, electrical shocks, fire hazards, overheating, and system malfunction are noteworthy.
Fifth, following safety standards, avoids legal complications and penalties. Sixth, properly installed inverters are better protected against environmental factors. It minimizes the risk of weather-related malfunctions.
Professional Installation Vs. DIY
While installing a solar inverter in your house, you can go for professional installations or DIY. Each has unique advantages and limitations. DIY installation is cost-effective, while professional installation requires additional labour. The professional installation gives you reliability. Conversely, DIY installation depends on your skills and experience. However, installing a solar inverter in your house is easy. All you need to do is have some knowledge about electrical connections. Besides, Lux Power Tek can always guide you through the whole process.
| Professional Installation | DIY Installation |
| Involves professional hand with industry knowledge | Based on your knowledge & research |
| Professional technicians always work with sufficient expertise | You may have limited experience, which may lead to mistakes |
| Uses professional-grade equipment & tools | Limited access to specialized tools |
| Professional installation always follows comprehensive planning for setup | You may lack expertise in optimal system design |
| Professional installation offers warranties and reliability. | Self-reliance on troubleshooting & repairs |
| Professional installation requires less time. | DIY installation requires more time |
| Professional installation can be expensive. | DIY installation saves the labor cost |
Experts Advice
We have spent a long time discussing how to install a solar inverter. However, there are a few more things to remember throughout the installation. These are often known as “expert tips.” Using this advice will guarantee a more precise and efficient installation procedure. In addition to the eight steps listed above, we hope you will carefully consider the following six suggestions.
Tip#1 Safety First
Always prioritize safety throughout the installation process. Follow the manufacturer’s instructions to learn more about this.
Tip#2 Choose the Right Solar Inverter For Your Project
An appropriate solar inverter is key to optimizing energy production. Based on your requirements, consider the system size, type of connection, and compatibility.
Tip#3 Ensure You Have the Supporting Equipment for Rapid Shutdown
Rapid shutdown is a crucial safety regulation that you must focus on. According to NEC 2014, having rapid shutdown capabilities in your system is compulsory. This device typically deactivates solar energy generation swiftly. It ensures safety both for occupants and first responders.
Tip#4 Follow the manufacturer’s instructions
During installation, we always recommend our customers follow our guidelines. Our instructions include all the necessary steps to complete the setup.
Tip#5 Choose the Correct Location for the Installation
A suitable placement of the solar inverter contributes to its overall efficiency. Ensure the installation place is free from weather hazards like rain, dust, snow, or extreme temperatures.
Tip#6 Seek a Professional Electrician (if necessary)
For more complex installations or if you lack electrical expertise, enlist the services of an electrician. You can also reach out to our customer section to learn more about how to solve your problems.