Introduction
The use of photovoltaic (PV) panels, which convert sunlight into power, has seen exponential growth in recent years. An inverter is a crucial part of every solar power system because it transforms solar energy into usable electricity. So, let’s explore the intricacies of connecting PV panels to an inverter. After reading this article, you will be able to start harnessing the power of the sun for your needs.
Understanding PV Panels and Inverters
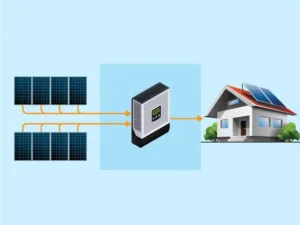
Understanding the functions of PV panels and inverters is essential before installation. For converting sunlight into direct current (DC) power devices known as Solar panels, or PV panels are used. Inverters are essential because they transform the DC power produced by the PV panels into the alternating current (AC). Homes and businesses utilize electricity in AC form.
Types of Inverters
There are several variations of inverters, each with distinct merits and factors. The three main categories include string inverters, microinverters, and power optimizers.
1. String Inverters
These are the most prevalent. They involve stringing up many PV panels to feed into a single inverter. They are cheap and work well in settings with constant sunlight.
2. Microinverters
In this setup, individual microinverters are attached to each solar panel. In cases when shade or panel orientation is variable, this layout performs well.
3. Power Optimizers
Power optimizers at the rear of each panel help maximize the energy production of individual PV panels. They are a suitable option for partly shaded locations and function in tandem with a central inverter.
Selecting an Inverter
When considering the choice of an inverter for a PV panel system, certain considerations come into consideration:
1. System Size
The dimensions of the PV panel array will have an impact on the capacity of the inverter.
2. Budget
The costs of inverters may exhibit substantial variation. Therefore, it is suggested that you choose an inverter that fits within your budget.
3. Efficiency
It is advisable to seek high-efficiency inverters to optimise energy conversion.
4. Monitoring
You can keep tabs on your system’s efficiency with the help of an inverter’s built-in monitoring features.
5. Compatibility
Make sure the inverter you bought is suitable with your solar panels.
Gathering Equipment and Tools
It’s important to have all of the required tools and equipment on hand before beginning the installation procedure. Tools, PV panels, inverter, mounting equipment, cables, and connections are all part of this package. In addition, while dealing with electrical components, it is essential to put safety first. Use appropriate safeguards and follow all safety protocols to guarantee this.
|
Equipment and Tools |
Purpose |
|
PV Panels |
Capturing sunlight and generating DC electricity |
|
Inverter |
Converting DC electricity from panels to AC electricity |
|
Mounting Hardware |
Help in securely attaching the PV panels to a mounting structure |
|
Cables and Connectors |
Electricity transmission between panels and inverter |
|
Junction Boxes |
Protection and connection of cables |
|
Tools (screwdrivers, etc) |
Assist in securing panels and making connections |
|
Safety Gear |
Personal protective equipment for safe installation |
|
Ladder |
Access panels and mounting area |
|
Multimeter |
Test electrical connections and voltage levels |
Step-by-Step Installation Process
If you follow these steps, connecting your PV panels to an inverter shouldn’t be too difficult.
1. Mounting PV Panel
- Location and Orientation
Consider elements like sunshine exposure and shade to choose the best spot for your PV panels. Put them up on something solid and stable. Make sure to orient the panels properly to get the most sunlight.
- Mounting Structure
Use the proper hardware to attach the PV panels to the mounting framework. To guarantee correct spacing and alignment, follow the manufacturer’s instructions.
2. Wiring PV Panels
When considering the wiring of solar panels, there are three primary connection options available:
- Series
- Parallel
- Series-parallel
Every connection possesses its own set of advantages and disadvantages. Therefore, it is crucial to thoroughly comprehend them prior to selecting the most suitable option.
- Series Connection
One solar panel’s positive terminal is joined to another’s negative terminal to form a series link. This increases the voltage but has no effect on the current flow. Connecting solar panels in series is an effective way to increase the system’s output when conditions call for it. This is true when the panels and the inverter are situated far away from each other.
- Parallel Connection
Connect the positive terminals of PV panels together and negative terminals together. This method increases the current without undergoing changes in the voltage. When part of your solar panels is being shaded, you can enhance the current of your system by this.
- Series-Parallel Connection
It is a configuration that incorporates both series and parallel connections. To increase the voltage, the positive terminal of one panel is connected to the negative terminal of another panel. Subsequently, these interconnected strings are connected in parallel. This feature enables the user to enhance both the voltage and current output.
When installing the wiring for your solar panels, it is crucial to consider the voltage specifications. The voltage of both your panels and inverter is an important parameter. Always use wiring that is rated for the system’s voltage and current to ensure everyone’s safety. Utilise appropriate connectors and adhere to the manufacturer’s instructions with utmost care. Make sure you’re using outdoor-rated wires and plugs. You should properly fasten and protect the wires from the elements and vermin.
3. Connecting to the Inverter
- Positioning the Inverter
Put the inverter somewhere cool and out of the sun, ideally near the solar panels. Make sure it can be reached quickly and readily for upkeep in the future.
- DC Connection
Establish a connection between the DC output of the PV panels and the DC input of the inverter. To avoid making the opposite connection by mistake, verify the polarity.
4. AC Connection
- Establishing connection with the Main Electrical Panel
To do this, a dedicated circuit breaker must be installed. Also, all applicable electrical requirements must be followed.
- Grid Connection (if necessary)
A grid-tie inverter synchronised with the utility grid is required for selling excess electricity back to the grid.
5. Testing and Commissioning
- System Inspection
Comprehensive assess all connections to verify their proper installation and insulation. Please ensure that there are no visible exposed wires or connectors.
- Inverter Activation
Proceed to activate the inverter and closely monitor its operational status. Most inverters are equipped with integrated indicators or displays. Such indicators and displays offer valuable insights into the performance of the system.
6. Maintenance and Troubleshooting
Routine maintenance entails on-going checks for damage or wear. Remove any dirt or debris that could impede the performance of the PV panels. If you have low output or malfunctions, see the manufacturer’s documentation or seek professional assistance.
7. Safety Considerations
Always put safety first while working with electrical equipment. Don’t skimp on safety by not wearing the proper gear.
Best solar array configuration
Solar array configuration plan will enable you to effectively optimise the voltage and current output of your system.
1. Maximum DC input voltage
There are a number of compelling reasons to cap DC voltage at a certain level. These include safety considerations and compliance with NEC regulations. Also included are the alignment with the technical specifications of a string inverter. According to National Electrical Code (NEC), the maximum voltage limit for residential PV systems is 600V. However, depending on the individual central inverter being utilised, this limit might change.
2. Minimum input voltage for DC
The presence of a minimum DC input voltage is crucial for the successful initiation of a string inverter. This makes it a significant consideration in the planning and configuration of PV systems. The numerical value of this metric exhibits significant variation. It is dependent upon the model and manufacturer selected.
3. Maximum DC input current
The inverter’s maximum DC input current is limited by its technical requirements. The current-voltage curve (IV-Curve) for a solar cell served as the design model for this value. It is crucial to consider this particular aspect when connecting solar panels. You should ensure that the DC output of the system does not surpass the maximum input current specified for the inverter.
4. Maximum Power Point Tracking (MPPT)
MPPT trackers are designed to optimise the power output of PV systems by considering the characteristics of the IV-Curve. Centralised inverters with numerous MPPT trackers increase solar panel string power production. This allows a more complex solar array layout while maximising power production by connecting it to the central inverter. If your inverter is equipped with two or more MPPT inputs, it is important to utilise them effectively. You should consider this particularly when there are multiple orientations or shading issues.
Conclusion
You’ve successfully finished the steps to link your PV panels to an inverter! You’ve made great progress towards powering your life with sustainable, environmentally friendly methods. You now possess the knowledge to harness the sun’s energy by understanding the fundamentals of PV panels and inverters. Just choose the appropriate equipment and install it in a step-by-step manner.