Si l'onduleur est acheté, l'étape suivante consistera à expliquer comment l'installer. L'élément principal du processus d'installation est la connexion entre le panneau solaire et l'onduleur. Ainsi, si vous ne souhaitez pas faire appel au fabricant pour l'installer à votre place. Ou si vous devez connecter les panneaux solaires à l'onduleur pour une raison spécifique. Cet article peut vous aider.
Types d'onduleurs de connexion aux panneaux solaires
Avant de créer le circuit, vous devez déterminer le type de connexion approprié pour votre système solaire. Il existe deux types généraux de connexion. Le soleil positif peut prolonger considérablement la durée de vie de la ligne. En même temps, il faut acheter des câbles spécifiques au système solaire. Il faut également utiliser un dispositif spécifique au système solaire.
- Câblage d'un système parallèle monophasé
- Câblage d'un système triphasé
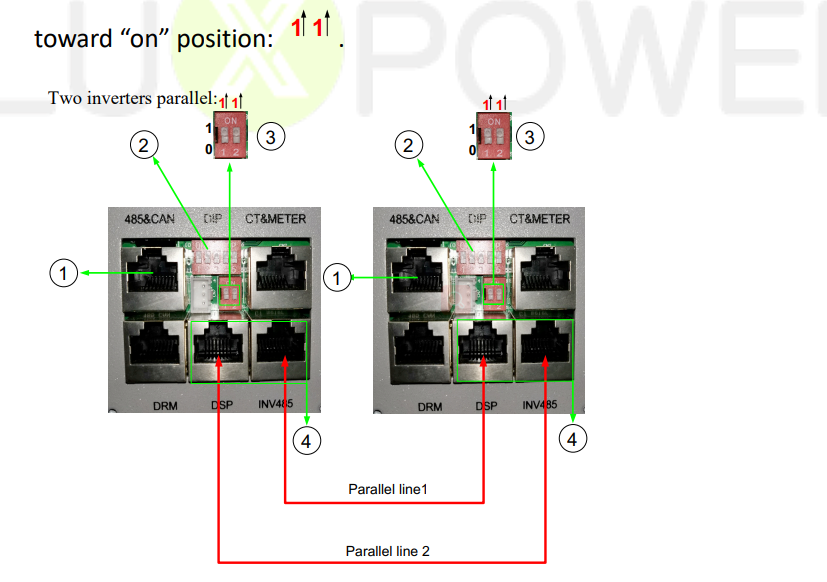
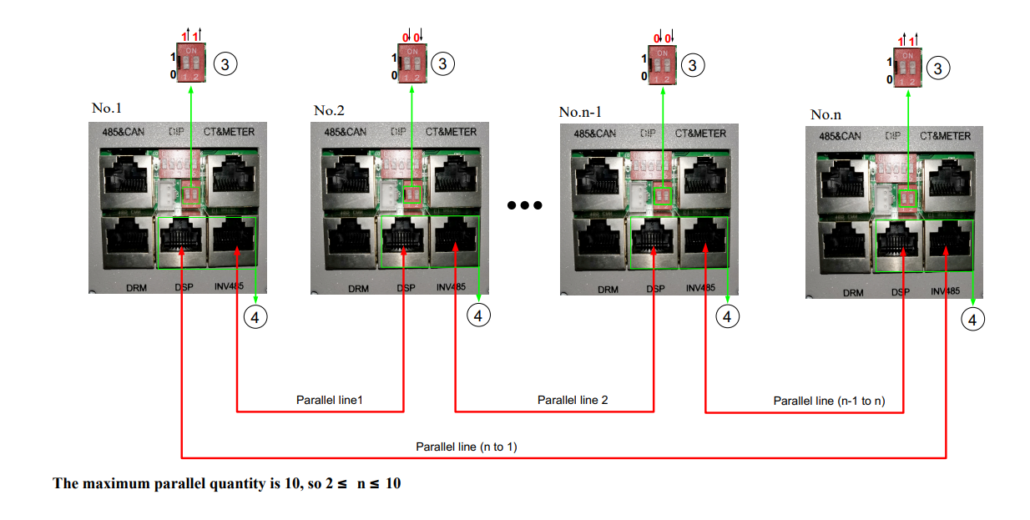
- Connexion de la batterie dans un système parallèle
Onduleurs tandem avec panneaux solaires
La connexion de panneaux en série augmente la tension du système. En effet, l'onduleur a besoin d'une tension spécifique de la part du système solaire pour fonctionner correctement. Pour augmenter la tension des panneaux solaires, nous utiliserons donc une connexion en série. Cependant, il ne faut pas en connecter trop en série, car le dépassement de la capacité maximale de l'onduleur affectera sa durée de vie.
Connexion en parallèle des panneaux solaires et des onduleurs
La connexion en parallèle de l'onduleur et des panneaux solaires entraîne une augmentation du courant et un maintien de la tension. Les bornes positives des panneaux solaires sont connectées, de même que les bornes négatives des deux panneaux lorsqu'ils sont connectés en parallèle. La connexion en parallèle permet de connecter plus de panneaux solaires et de produire plus d'électricité.
Panneaux solaires connectés en série plutôt qu'en parallèle
Les panneaux solaires connectés en parallèle et en série ne sont pas les seules options. Cependant, nous avons constaté, après diverses enquêtes, que les panneaux connectés en parallèle et en série sont les deux façons les plus courantes de connecter les systèmes solaires.
La tension et le courant de sortie totaux maximums du champ solaire doivent être pris en compte pour établir les connexions en série et en parallèle. Les panneaux solaires et les circuits connectés en série ont un fonctionnement similaire. Une défaillance de l'un des panneaux connectés en série entraînera un dysfonctionnement de l'ensemble du circuit. En revanche, un problème sur un panneau solaire ou un fil mal branché dans un circuit parallèle n'affecte pas les autres panneaux solaires. Le type d'onduleur et la manière dont il est câblé influencent donc l'efficacité des panneaux solaires connectés en série et en parallèle.
Quel est le câblage le plus efficace - en série ou en parallèle ?
Le câblage en parallèle est préférable pour les onduleurs de la maison. Ainsi, les panneaux individuels n'auront pas d'impact. Les autres panneaux continueront à fonctionner normalement même si l'un d'entre eux tombe en panne. Bien entendu, il existe aujourd'hui des onduleurs hybrides qui prennent en charge un mélange de connexions en série et en parallèle. La connexion en série ou en parallèle n'est donc pas le seul critère de choix d'un onduleur.
Comment connecter des panneaux solaires en série à un onduleur ?
Le câblage en série est généralement utilisé pour les onduleurs connectés au réseau ou les régulateurs de charge qui nécessitent 24 volts.
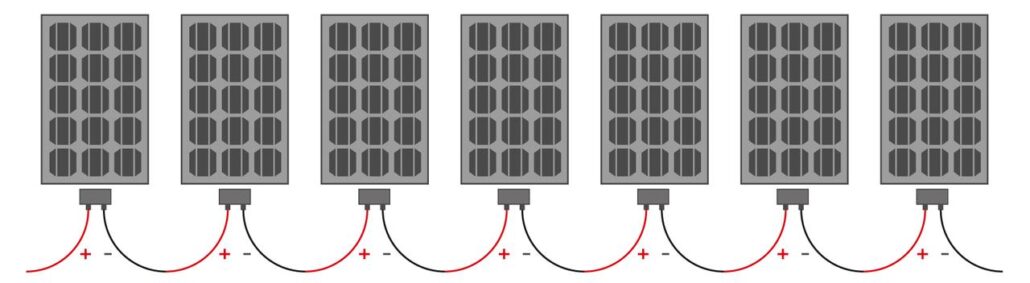
Les bornes positives et négatives des panneaux solaires sont similaires à celles des batteries. La borne positive d'un panneau est connectée à la borne négative du second panneau pour créer une connexion en série. De cette manière, au moins deux panneaux solaires peuvent être connectés pour créer un circuit de source photovoltaïque.
Bornes positives et négatives sur les panneaux solaires tandem ?
Les onduleurs de branche ont besoin de panneaux solaires pour fonctionner et ont une fenêtre de tension nominale. En outre, il possède le courant nominal requis pour que l'onduleur fonctionne efficacement. Les onduleurs de branche sont dotés d'un dispositif de suivi du point de puissance maximale (MMPT), qui fait varier le courant et la tension afin de produire le plus d'énergie possible.
Le câblage et les connecteurs des panneaux solaires facilitent la tâche. Les panneaux solaires tandem constituent un choix idéal pour les environnements extérieurs. Si vous êtes installateur, le module que vous utilisez a probablement été conçu pour utiliser ce connecteur afin de le fixer à la boîte de jonction située à l'arrière du panneau.
La boîte de jonction contient deux fils.
- Le connecteur MC4 femelle se connecte généralement au câblage CC du système solaire à l'aide d'un seul fil, le positif CC (+).
- L'autre est le négatif DC (-) : il est généralement utilisé pour le connecteur mâle.
L'avantage du câblage en série est que l'énergie peut facilement être transmise sur de longues distances. Inconvénient : si un seul panneau est couvert ou recouvert de feuilles ou d'autres débris, cela peut affecter l'ensemble de la chaîne.
Comment connecter en parallèle des panneaux solaires à un onduleur ?
La borne positive du panneau solaire est connectée à la borne positive et la borne négative est connectée à la borne négative. Il est ainsi plus facile de connecter les panneaux en série. Cela permet une meilleure connexion de tous les panneaux entre eux.
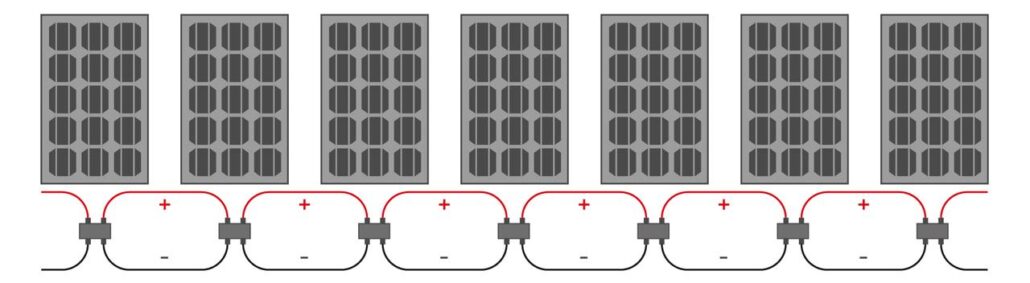
C'est le contraire du câblage en série. Avec le câblage en parallèle, les courants s'additionnent alors que les tensions restent les mêmes. Les panneaux ombragés ou couverts n'influencent pas le reste de la chaîne grâce au câblage en parallèle. Comme pour le câblage en série, vous pouvez connecter différents panneaux solaires en parallèle. Le problème est que votre système doit être réglé sur la tension minimale, bien que les courants s'accumulent.
Comment connecter des panneaux solaires à un onduleur
Les panneaux solaires et les onduleurs pour la maison sont devenus une nécessité. Les onduleurs permettent de faire fonctionner tous les appareils ménagers, ce qui est pratique en cas de coupure de courant.
Pour ceux qui souhaitent disposer d'électricité 24 heures sur 24, les panneaux solaires et les investisseurs jouent un rôle crucial. À un moment donné, en raison de ses capacités silencieuses et non polluantes, un onduleur est quelque chose que chaque maison devrait avoir.
- Relier l'onduleur et le panneau solaire.
- Connectez les batteries à l'onduleur.
- Relier les batteries et l'onduleur.
- Relier le panneau solaire et l'onduleur.
- Connectez la batterie au panneau solaire.
Comment installer soi-même le panneau solaire et l'onduleur ?
Tout d'abord, connectez le fil positif du panneau solaire à la borne positive de l'onduleur. Ensuite, connectez le fil négatif du panneau solaire à la borne négative de l'onduleur.
Nous pouvons diviser le processus d'installation en quatre étapes différentes.
1. Installation de panneaux solaires.
Placer fermement les panneaux solaires sur le toit n'est pas une opération simple. Nous pouvons avoir besoin de l'aide d'un professionnel. Nous devons également trouver l'emplacement le plus approprié pour les panneaux solaires. Maximiser la collecte de la lumière du soleil et la convertir en énergie solaire.
2. Connecter le contrôleur de charge.
Sa principale fonction est de veiller à ce que le courant soit constant. En effet, un courant non constant peut être très dommageable pour l'onduleur. Afin de garantir que le courant obtenu à partir des cellules solaires s'écoule dans l'onduleur à un rythme constant, nous devons installer un régulateur de charge entre les panneaux solaires et l'onduleur.
3. Connectez la batterie à l'onduleur.
Connectez la borne positive (+) de la batterie à la borne positive (+) de l'onduleur et la borne négative (-) de la batterie à la borne négative (-) de l'onduleur. Au dos de l'onduleur, vous verrez la position indiquant l'entrée 12V DC. L'onduleur doit être éteint pour cette opération.
4. Connecter la batterie pour charger le contrôleur.
Le contrôleur de charge possède des bornes positives (+) et négatives (-) pour la batterie, comme indiqué à l'étape 3 (ci-dessus). Relier la borne positive (+) du contrôleur de charge à la borne positive de la batterie et sa borne négative (-) à la borne négative de la batterie.